Saturday, April 30, 2011

Top Ten Finalist!


I just found out that I'm a Top Ten Finalist in the Knock It Off Contest at seventhirtythree, for my Anthropologie Sun Shades Dress Knock Off.  I'm seriously excited about this!  I may have literally jumped up and down when I found out.  :) 

Voting starts on Monday.    Please vote for me!  :)

Friday, April 29, 2011

Card Club

A few friends and I have a card club. When I started going, I really didn't know how to make cards.  But I went anyway, for the fun of it. I learned as I went along, and I think I'm getting better. These are the cards I made for last night's meeting:

 
I made them from the Flower Card pattern/tutorial at mmmcrafts.  Some day I'l get good enough at this card-making thing to come up with my own designs.  :)
I had fun picking the fabrics out of my fabric scraps.  I like the blue and red ones, and the green and red ones a lot. 


But, I think this one, in purple, is my favorite:
It got given away in our card swap last night.  I think I might need to make another one for myself.  :) 

Thursday, April 28, 2011

Scalloped Edge Baby Quilt Tutorial

A new niece is a lovely excuse for making pretty baby things. I've been dying for an opportunity to use some pretty girly, floral fabric. I thought this scalloped-edge baby quilt would be the perfect chance for it.

After prewashing and ironing your fabrics, lay out the fabric right-sides together (I used 1 yard of each fabric for this project).
Put the right-sides-together fabric on top of your quilt batting.

Smooth out any wrinkles or creases.
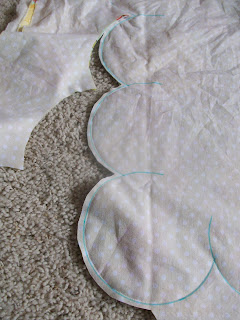
Trace a scalloped pattern onto the fabric with a bowl or plate.  The size of my bowl allowed me to do 5 scallops by 7 scallops on my fabric.

I measured how far in I wanted the scallops to go, so they'd all be the same.

Pin the three layers together.


Stitch along the line you drew, leaving enough room to turn it (I left one scallop).

Cut off the excess.
Trim curves, especially in between the scallops.  Cut all the way to the line in between the scallops, being careful not to clip your stitches.
Turn.  Using a pencil or your hand, push out all the seams, making it look the way you want.  Press.  Stitch closed the portion you left open. 

Quilt your quilt, "drawing" a line with your stitches from the edge of one scallop to the end of its sister across the other side of the blanket.

Continue quilting along the length of your quilt.

Admire your work!

Sunday, April 24, 2011

Happy Easter!

I hope you're all having a lovely Easter Sunday!  Hubby, the kiddos, and I had a lovely Easter dinner of ham, potato casserole, Jell-o Jiggler Easter Eggs, and Pioneer Woman's roast asparagus.  We used our cute Easter plates from Target (love the plaid!) and I made carrot silverware bundles, as seen at Our Best Bites.


I even tried my hand at Instructables' homemade Cadbury Creme Egg recipe.  They turned out a little flatter than I intended (I didn't freeze them for long enough before dipping), but they are very yummy!  

It's been a nice, relaxing, Easter.  In addition to Easter celebrations, we're celebrating the arrival of a new adorable niece this week.  And, I finished her baby quilt just in time!

This mom of boys had great fun picking out fabrics for this sweet baby girl.  Look for a tutorial for the quilt later this week!

Wednesday, April 20, 2011

1950s Sheath Dress

I finished this dress last week.  It's a two-piece sheath dress with kimono sleeves, from a reproduction pattern from 1955.  I made it for a friend of mine who enjoys vintage-style clothing. 


It was a bit trickier that I'd originally imagined.  The neckline didn't want to cooperate with me.  And, being fully lined, there was quite a lot of hand stitching to do.  So, I'm rather pleased to be done with it.  :)


It's cute, though, even if at one point I contemplated burning it in frustration.  :)   The lilac color is lovely, don't you think? 

Monday, April 18, 2011

Vintage Patterns

I have a vintagey sort of style, but have never actually sewn from a vintage pattern. Vintage Reproduction, yes (LOVE Butterick patterns!), but never truly vintage. I was so excited to find these cute vintage patterns in my size:

Granted, it may be awhile before I get a chance to make them.  I've got quite a few projects in line ahead of them, with weddings and babies in the family this spring and summer!  But, at very least, I can use them as eye candy, right?  Aren't they lovely?

Wednesday, April 13, 2011

Anthropolgie Sun Shades Dress: Finished Product

Remember how I was going to make my own version of the Anthropologie Sun Shades Dress?  Well, it's finished. 
Here's Anthropologie's dress:
And here's mine:

Mine is, of course, a little different than Anthro's.  For starters, mine has sleeves, since Anthro's version wasn't exactly modest.  If I'd bought the dress, I'd have added a cute cardigan to go over it, but as I was making it from scratch, why not add sleeves? 

Also, mine is a brighter gold than Anthro's version, since that's the color ribbon and fabric that was easiest to find.  I didn't realize how much brighter it was until I was in Anthropologie again and looked at the Sun Shades Dress again.  I think I actually like my version better.  It's a happier color than the almost bronze gold of the original. 

It was, as predicted, a beast to create.  I ended up drafting the pattern pieces from scratch, for the most part, which was rather difficult without a dress form.  (Oh, how I'd love a dress form...)  I made several mock ups and tweaked the fit by trying it on over and over again.  The bodice isn't perfect (and it doesn't help that I've lost weight since starting the project), but after all that work, I'm declaring it good enough. 

The stripes are "mango" broadcloth, cut on the bias into strips, and "gold-yellow" grosgrain ribbon from Walmart.  The white fabric is Walmart's Teeshot, a cotton/poly blend often used for making scrubs.  The dress is self-lined, with a 6 inch wide gathered tulle hem on the skirt lining for fullness (as on the original dress), and has a side zipper.  The mock ups (or "muslins") were made with broadcloth scraps I already owned.  Total cost to make:  $22.  Savings compared to original dress:  $136.  Not too shabby!

Linking to these great link parties.
Participating in the Knock It Off Contest at seventhirtythree!

Tuesday, April 12, 2011

Sculpey Flowers and Necklace Tutorial

Okay, so here is the Sculpey Flowers tutorial I promised!  I'll show you how to make a pretty rose out of Sculpey, as well as how to make the necklace below:


1.  Work the Sculpey (or whatever other brand of polymer clay you're using) until it's easily pliable.  Squish it and twist it until it is soft.  I was trying to match the color of the flowers to the color of my dress' sash, so I blended two colors together to get the color I wanted. 

2.  Take a piece of Sculpey clay and place between two layers of wax paper.  On top of the wax paper, use some sort of rolling pin to roll out the clay (I used a heavy drinking glass, because I didn't want to get any clay on my wooden rolling pin, though I needn't have worried with the clay between the sheets of wax paper). 

3.  Find something to cut out small circles in your clay.  I used a very small cookie cutter (from a set of several sizes of round cookie cutters), and two different sizes of decorating tips that I had on hand. 

4.  Cut out a circle of clay with your smallest cutter. 

5.  Place the circle you cut in between two layers of wax paper.

6.  Roll out some more, until about as thin as 1/16th of an inch


7. Gently peel the circle off the wax paper and roll up, like an enchilada, or a spiral.  Repeat the cutting and rolling out process (steps 4-6) again with a slightly larger circle.  Put it on the side of the previously rolled "spiral tube," or center of the flower.  Press down on the bottom part of the "petal" so that it adheres to the bottom of the flower center.  Shape the edges of the "petal" so that it looks more like a rose petal. 

8., 9., 10.  Repeat the cutting and rolling out process for each new petal, using a slightly larger cutter as you get closer to the outside petals.  Place the petals onto the flower center, off-setting to make it look more natural. 


11.  Shape the flower petals so they look less like circles.  Press them out so they aren't standing straight up.  

12.  Get some eye pins. 

13.  Push an eye pin through the bottom of the flower. 

14., 15.  There will be a long "stem," from all the times you squished the clay petals together.  Cut it off with scissors.


16.  Paint on a glaze (I used Studio by Sculpey Satin Glaze) with a small paintbrush. 

17.  Let glaze dry for 30 minutes. 

18.  Bake according to manufacturer's directions.  I placed mine on parchment paper on the cookie sheet just in case, so nothing would stick to my cookie sheet. 


19.  To make the necklace shown, curl and close the straight end of the eye pins with a pair of jewelry making pliers (I bought a pair for around $2 from the Walmart craft section)  and connect to the other flowers' eye pins with jump rings.  Attach to a chain with jump rings.  (I bought a chain of the length I wanted at Hobby Lobby, cut it in half with a wire cutter, and attached jump rings to each cut end). 
20.  Wear and enjoy!


Tuesday, April 5, 2011

Pink Plaid Dress


This dress is my latest creation. It's made from Simplicity 2444.  And, check it out:  It has pockets!  I love dresses that have pockets.  :)


I thought it needed a necklace, with that higher neckline--a little bit more visual interest across that field of plaid..  But, I didn't have any necklaces that looked right.  So, I went back to my trusty Sculpy roses, and made another necklace!
This time, I took pictures as I went and I'm putting together a tutorial for you, so you can make your own rose necklace!  Look for it later this week or early next week!

Linking here.
Related Posts Plugin for WordPress, Blogger...