Showing posts with label Crafting. Show all posts

Thursday, March 6, 2014

100th Day Shirt!


Does your school celebrate the 100th Day of School?  My kids' elementary school does, in the lower grades at least.  Each kindergartner was supposed to wear a shirt with 100 things on it on 100th Day.  This is what he and I came up with.  He LOVES it and wears it whenever he can.  I think it's pretty darn cute, too.

I drew a monster on a clearance Target t-shirt with fabric paint pens.  Then, we hot glued 100 googly eyes to it.  I have no idea whether hot glue will hold up in the washer (I'm guessing not), so I've been hand washing it.  He's worn it to school like 5 times now (in fact, he's wearing right now!).

It makes me smile when I see it (and how happy he is to wear it)!

Thursday, September 5, 2013

Ancestor Cards

Well, Labor Day has come and gone, all the kiddos are back in school and we're back to a routine.  Time to get back to blogging!  It was a fun, though busy, summer for us.  Band camp, scout camp, family reunion, all sorts of fun things to do all summer long!  Our family vacation this year was to Nauvoo, Illinois.  It's kind of a living history sort of place.  It factors largely in my church's history and my family history.  It's a place I love to visit and my boys think it's very fun.  They got to try all sorts of fun old-fashioned things from the 1840s--making rope, having a log-sawing contest at the country fair, and seeing a bunch of demonstrations, from making horseshoes to baking bread.

Gearing up for my Nauvoo trip, I wanted an easy way to refer to information about my ancestors who lived there.  My children have 30 direct-line ancestors who lived in Nauvoo from 1839-1846.  So, there was a lot of family history to be learned while on our trip.

My dad and I have been working together on what we call "The Collection," our collection of family histories and photographs.  With the advent of the internet and social media, there are a lot of family photos and histories out there for the googling.  So, we've acquired a lot of new pictures of my ancestors.

As I started collecting these pictures, I was really excited about them and wanted to display them or somehow make it easier to see these pictures on a regular basis.  I thought about a family history display wall, but I don't have any wall space for such a thing.

Awhile back, I 
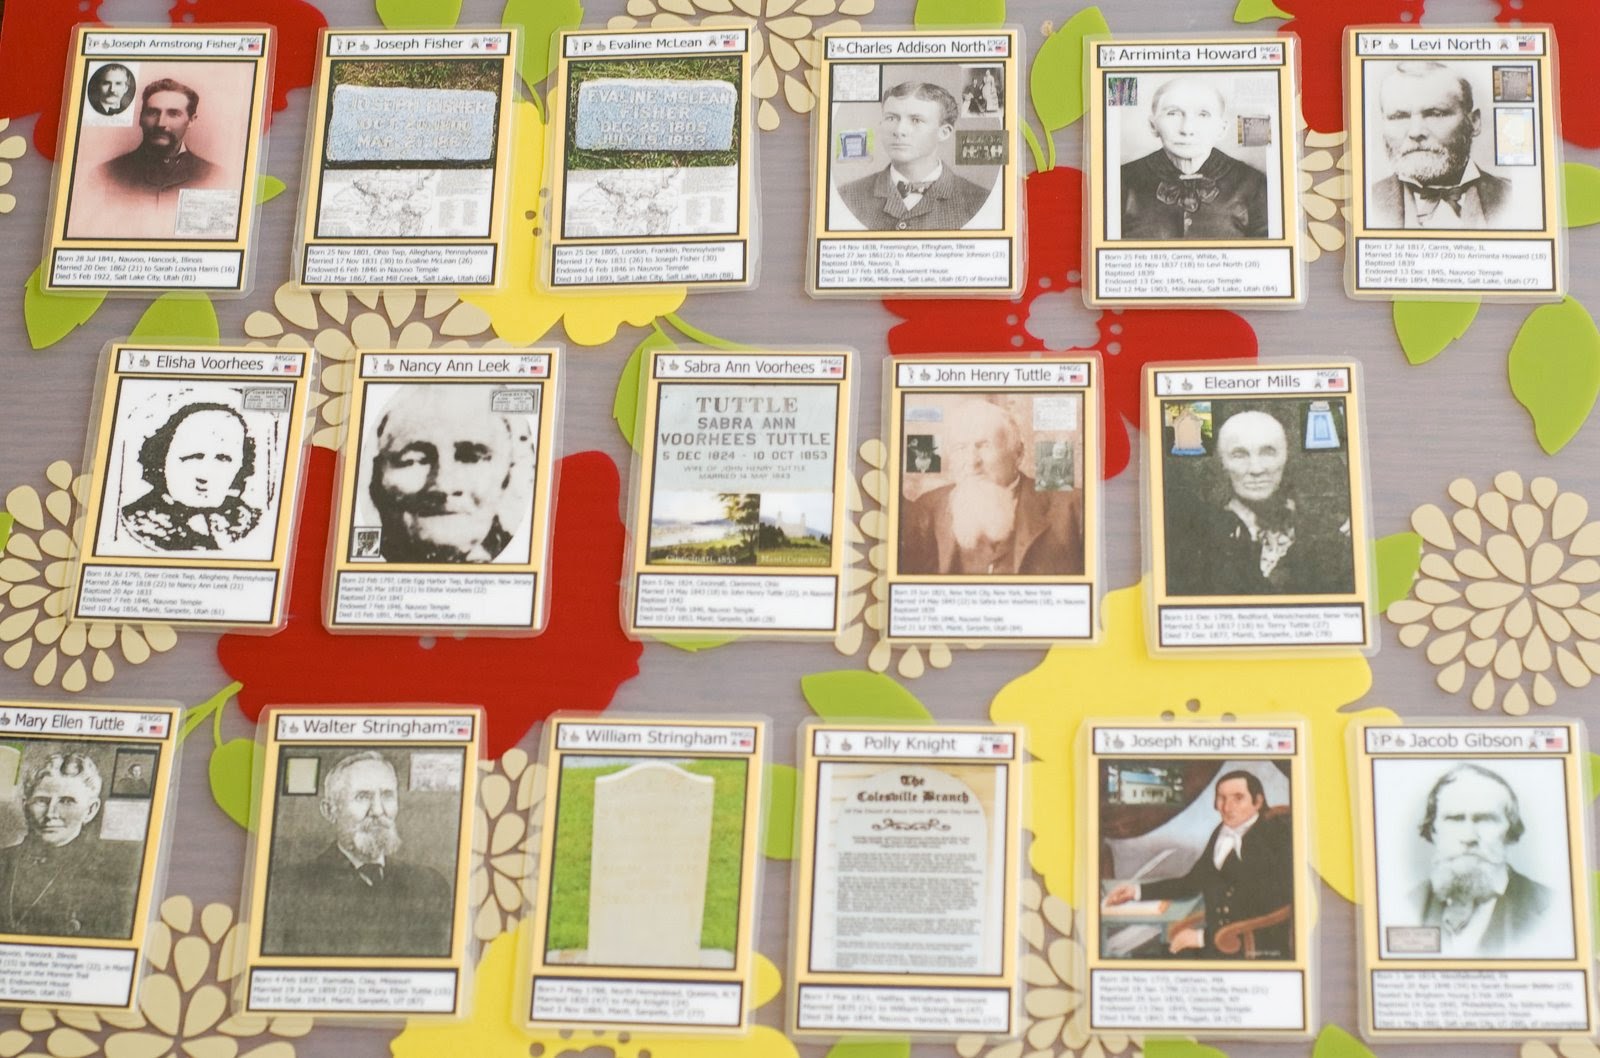
came across the idea to make Ancestor Cards.  I decided this was a perfect solution.  I started by making ancestor cards for my ancestors that lived in Navuoo, in preparation for our trip.  I hope to branch out (ha! family history pun!) to more of my ancestors in the future.


Each Ancestor Card has little icons on it to tell you more about that ancestor at a glance.  The Angel Moroni Icon means they were a member of the LDS church.  The Nauvoo Temple Icon means they lived in Nauvoo.  The Wagon Icon means they crossed the plains as a pioneer.  There's a flag from their country of birth, plus a little code that tells you their relation to me.  Joseph Armstrong Fisher down there has a P3GG because he is my Paternal 3rd Great Grandfather.  I also listed birth/marriage/death dates and places, as well as their ages at marriage and death.  When available, I used a picture of them for the front; when I didn't have one, I used a picture of their tombstone or a map of where they were from.  Sometimes they had more than one picture.

On the back, I listed bullet points about each ancestor (which I unfortunately forgot to photograph).  I had known many stories about my ancestors, but sometimes mixed up which ancestor went to which story.  The bullet points help me keep track of this.

Then, I know at just a glance which ancestor was the tailor who made suits for Joseph Smith and Abraham Lincoln, which one was widowed at a young age when her husband died in a shipyard accident, which one's fiance accidentally married someone else, which one made the lock for the front door of the Nauvoo Temple, and which one lost his hammer for 56 years when it got built inside the council building.


In order to make these Ancestor Cards, I read every history I had for each person.  For Joseph Knight, that meant a whole, quite long, book.  Some had 50 page histories, some had 10 five-page histories, and some had a 1 page summary from Find A Grave.  The cards took a long time.  I started in December and finished in July.

I started with my ancestors, then moved to my husband's ancestors.  His were a bit harder, because I didn't have as much information to begin with. To figure out which of his ancestors were in Nauvoo, I googled the likely people (mostly 3rd Great Grandparents) and read all their (and their family's) histories that I could find.  I was able to find pictures for most of them.


I color-coded the cards (yellow for my ancestors, green for my husband's).  There are 17 yellow and 13 green. I did them all in Photoshop Elements.


Oh, the printing and the cutting!  I printed (went through a lot of ink!) and cut out 95 individual ancestor cards (I made several sets to hand out at the family reunion in Nauvoo).  I thought I'd found a company that would do it cheaply, but they weren't able to print it quite the way I wanted, so I ended up formatting them to be front and back and printing them myself on my home printer.  I printed them on cardstock, then laminated them at a local office supply store.


Though they were an immense amount of work to put together, I am so glad I made them.  I hope to make more.  Originally designed to be a bit of a cheat sheet for me as I referenced my ancestors, they made it so that I don't need a cheat sheet anymore.  The process of putting them together has taught me about my forebears.


I know these men and women now.  They aren't just names and dates on a piece of paper or in a computer file.  They aren't just interesting stories or cool pictures.  I know and love each of these ancestors of mine now.  Of course, some day I will meet them in person, and get to know them even better.  But, the process of finding pictures, doing research, and reading their histories (and taking notes) so closely that I could pull out highlights, has taught me about these men and women as individuals and as children of God.

I think this is the most fulfilling "craft project" I've ever done.

Thursday, April 25, 2013

Squid

My son is super into squids right now. He wants to be a marine biologist, specifically studying the Giant Squid. He has decided upon his major, college choice, and future graduate work. This is awesome. Especially since he's 10. :) Granted, I picked my major when I was 12 (and got my degree in it) so it's entirely possible he'll see it through.

For now, he is constantly drawing squids, his pinewood derby car was a squid, and he and his best friend design submarines at recess everyday.  So, when I needed to come up with a birthday gift for him that could be made cheaply at home, I thought it'd be fantastic to make a stuffed squid for his bed. 

To say that he LOVES it would be an understatement. 


Personally, I'm rather proud of myself for thinking to use polka dot fabric for the suction cup sides of the arms and tentacles (he informs me that they're not all tentacles, only the long ones are). 

I didn't have a pattern, I just sketched out what I thought the squid should look like, added 1/2 inch seam allowances to my sketch, and cut it out.


It was a great scrap buster.  I used leftover polka dot fabric from this dress and gray fabric leftover from the Dumbledore costume from a couple Halloweens ago.  The eyes (one on each side) were made of felt I had in my stash. 
 
 
I sewed everything right sides together and stuffed it.  I basted it together as I assembled it, as working with all those arms was rather complicated--too complicated for pinning. 
 
 
I really love how it looks sitting on top of his green bedspread.  I'm proud of my little squid.  :)
 

seven thirty three

Tuesday, December 11, 2012

Baby Dear Baby Shower

 
I had so much fun putting this baby shower together. Baby Dear was my favorite book as a little girl. I especially loved its beautiful illustrations. I still have a thing for Little Golden Books today (I collect them, even).  I'd been looking for an excuse for years to throw a Golden Book themed party and this little girl baby shower was a perfect chance to do it! 

 
I tried to have a bit of a vintage feel to the shower, since the book was written in the 1960s.  In a moment of serendipity, right as I decided to have the shower feel a bit vintage, my mom called and asked if I wanted a stork decoration.  She was cleaning out some storage and thought I might like it.  Yes!  This cute little stork, while not from the 1960s, was used at my baby shower--the one where I was the baby!  It may be from the 1980s rather than the 1960s, but it definitely gave the vibe I was going for. 
 
 I used some sweet girly fabric to make a pennant banner. 
 
 
I think my favorite part of the decor, though, was this Baby Dear banner:
 
I scanned in illustrations from the book, found a similar font to the one used on the cover, and worked some Photoshop (Elements) magic.  I printed the resulting images out onto cardstock and cut them out.  I attached the letters to baby pink ribbon and hung it in my living room.  I think it's adorable, if I do say so myself. 


(Well, really, my favorite part were the invitations, but I already wrote about those...)  :)


I scattered some Little Golden Books around the party area, especially ones that were illustrated by Eloise Wilkin (the illustrator of Baby Dear).  Her little baby cheeks and pudgy fingers are so cute. 


Add in some doilies and yummy food and you've got a fun vintage Golden Book party!


I made cupcake toppers with some pink scrapbook paper and these 1-inch Pretty Vintage Little Girl Circles from Free Pretty Things


It was really nice to have an opportunity, in this house full of boys, to enjoy such girlishness!  It was such a fun baby shower!
 

Sunday, November 25, 2012

Mad-Eye Moody

I better hurry and get the rest of the Halloween costumes posted before Christmas, eh? :) Is it just me or are the last 3-4 months of the year like a train speeding towards a cliff sometimes? I swear it was just September, and now there's just a month left in the year. The time just seems to evaporate!

One of my twins wanted to go as Mad-Eye Moody this year.  He's a big Harry Potter fan.


And, his costume was pretty easy.  No sewing involved this time.  He wore a brown t-shirt, khakis, and an old "pleather" jacket of mine.  He carried a wand that was really the staff of one of those little American flags everyone waves on the 4th of July.  


The main construction part on his costume was the "mad" eye.  Years back, we bought a box of plastic animals from Michael's or somewhere.  Its lid was a spinning globe.  I held onto it, thinking it might come in handy sometime.  And it totally did!  I painted the globe to look like an eye.  I hot glued it to some black felt, and attached a ribbon.  Easy (and free, since I already had all the supplies!) mad-eye.  

Sunday, September 9, 2012

Cleaning Cards

 
Using these cards as my inspiration, I made my family some detailed cleaning cards so they can effectively help me clean our house.  They've been great.  "Go clean your room" can be a bit overwhelming to a kid.  Now, my boys have the chore broken down into manageable parts.  And the room actually gets (mostly) clean!


Monday, April 16, 2012

Quick Zipper Pull

Hi, I'm back! Please forgive my two-week absence, my family and I took a lovely trip for Spring Break. Now that I'm back and getting back on top of things, it's time for a new blog post!

Do you ever lose your zipper pull? The one on my purse, a nice leather pull, is about to come off the zipper entirely. I've been thinking for awhile about how to replace it when it inevitably breaks off. I suddenly had the solution, as I was packing my boys for our trip. I don't know why I didn't think of it before. And, you all will probably wonder why I'm bothering to blog about it...I bet you've already thought of it. :)

As I was packing, I noticed that my little guy's backpack was missing its zipper pulls, too.  Once upon a time I'd replaced the pull with a safety pin, to give me something to pull to zip it shut, but it kept opening and poking my hand.  Not the safest option.


Instead, I used ribbon!  I threaded a little grosgrain ribbon that I had lying around through the zipper and sewed it together at a couple points (um...really quickly, which is why it's so crooked.  I was more interested in speed than appearance at this point.  If I had been, I probably would have bothered matching the thread, too.).  Voila, a new zipper pull!


Saturday, March 31, 2012

Star Wars Apron Tutorial

My son has this adorable robot apron from Old Navy. It was starting to get too small, so I told him I'd get him another. I wish they still sold those cute boy aprons, but I bought it years and years ago. He just loved the cute screen printing on it, though, and didn't want a plain "manly" apron. So, I thought I'd try the freezer paper stencil technique I've seen around blogland and make a cool Star Wars Apron.


First, I bought a basic apron from the craft section at Walmart.


Then, I found a pumpkin carving stencil online.  (Found here.)  He has been super into Star Wars lately, so I thought a Storm Trooper would be fun.  I printed it onto freezer paper.


I taped it down so it wouldn't wiggle while I cut, then cut out the black areas with an exacto knife.
 
I then positioned the stencil where I wanted it on the apron and ironed it on (shiny side down).  Make sure your iron is hot enough that the stencil is tightly stuck.  The first time I tried this (craft fail!) I didn't iron it well enough and paint seeped underneath the edges.  


I used fabric paint and a sponge brush to paint the openings in my stencil.  


I put on a couple of coats, until it didn't look pink anymore.  When it was nearly dry, I peeled off the stencil. I let the paint dry fully, and then I ironed over it to set the paint.  (I have no idea if that is even necessary, but I figured it couldn't hurt.)  

I think the Storm Trooper apron turned out really cute.  It's perfect for my boy. 
 
Related Posts Plugin for WordPress, Blogger...